This post is for travelers looking for itinerary tips and ideas. If you are usually here for the stories, feel free to skip this one. It is about to read more like a guide-book. If you are looking for ideas on how to structure an itinerary for one month in Japan, then here we go!

Transportation
Japan Rail Pass
When does the pass activate?
What is the Green Pass?
The Green Pass is the first class pass. The biggest benefit is larger seats that recline farther. We did not feel the need to spend the extra money as the standard seats already offer plenty of legroom, even for Fletch who has long legs.
Culture tip: I noticed that every time the person sitting in front of someone reclined their seat, they peeked back at the person sitting behind them to ask if it was ok to do so. This nicety can easily be accomplished with hand gestures.
So I just show up at the train platform with my JR Pass?
For local routes it is not necessary to book a seat assignment.
These Boots Were Made for Walking
Most of the accommodation we booked was within a ten minute walk of the train station, and so we never saw the inside of a taxi. The entirety of our trip utilized either the public transport system, or walking.
There’s an App for That
Suica Cards
It is definitely worth it to purchase a Suica Card (one each) at your earliest convenience. These are prepaid cards used for bus and metro fare, and can even be used at many convenience stores. I figured we wouldn’t need them until our JR Passes ran out, but there were numerous occasions when having one would have been way more convenient than fishing around for the right change.
I say one each because we did initially try sharing a card. I would scan it for fare, and then pass it back to Fletch who would try to scan it again. The system wouldn’t accept that though.

Accommodation
For the mid-range budget for a couple, there’s really not much variety in hotel rooms. A low budget brings up an assortment of hostels, guest houses, and capsule hotels, but those all have single beds and shared bathrooms. Some hostels have a few private rooms on the side with double beds, but the price comes out to about the same as a business hotel. The business hotels have notoriously tiny rooms, so be careful to always read the square meterage when shopping. I finally came up with a method that involved finding the biggest room that was closest to the train station for the best price. The hotels we ended up sleeping at are listed here, but due to price fluctuations, these may or may not still be the most cost effective. I will also note that most business hotels are created more or less equally, so don’t worry too much about the quality. It is safe to shop by floor space.
Due to Japan’s wonderful dining options, we never opted to pay more for the included breakfast.
We also stayed at a few Airbnbs during our travels. When I started booking, this was a great option as we could get more space for a much lower price. Unfortunately Japan shut down 80% of Airbnb’s listings during our stay, and so a few of these may no longer be valid options. I will be sure to indicate if that is the case.
Eating
Japan is home to some of the most wonderful food in the world. I encourage you to wander around and try it all. A trip to Japan is as much a culinary experience as it is a cultural experience. For this reason, only a few recommended restaurants will be mentioned below. If you are traveling on a tighter budget, convenience stores offer more food than you would imagine for cheap, and noodle shops are always inexpensive and filling.
Culture tip: restaurants in Japan tend to be tiny, and so at many places it is considered rude to linger around longer than it takes you to eat. Some busier places may tell you up front how long you may sit at the table.
All prices listed are in US dollars, and assume a rough exchange rate of 100 yen to $1. (In other words, after all the work I put into creating this, I’m still to lazy to find the yen symbol).

Itinerary
Day 1 – Arrive in Tokyo
- Purchase Japanese SIM cards at the airport if you have unlocked smartphones. We found a kiosk near the exit.
- Follow JR signs downstairs to the ticket office and exchange vouchers for your JR Passes. Book tickets on the next Narita Express towards Ofuna.
- Board Narita Express towards Ofuna. Debark at Tokyo Station. Journey time: 1h 0m.
- Walk to, and sleep at Daiwa Roynet Hotel Ginza. Price: $165 per night.
Day 2 – Acclimate in Tokyo
Suggested Activities:
- Tsukiji’s outer market opens at 5:00 AM, and is a great way to take advantage of jet lag. Roam around and enjoy sampling different culinary creations for breakfast.
- Take a stroll through nearby Hamarikyu Gardens and learn about duck hunting. Entrance Fee: $3 per person.
- Catch a showing at the traditional kabuki theater, Kabukiza. Ticket price varies as per the length of the show. The single act we chose was $6 per person.
- Sleep at Daiwa Roynet Hotel Ginza. Price: $165 per night.
Day 3 – Travel to Sendai
- Have breakfast at Eggs ’n Things if you are already craving your egg fix. Price: $38 for two meals, two coffees, and juice.
- Check-out of hotel and walk to Tokyo Station.
- Book tickets to Sendai. Sample route: Hayabusa to Shin-Hakodate-Hokuto. Debark at Sendai Station. Journey time: 1h 32m.
- Walk to, and sleep at Hotel Vista Sendai. Price: $75 per night.
Day 4 – Explore Sendai
Suggested Activities:
- Walk to Hapina Nakakecho Shopping Arcade. There are some breakfast options here, as well as game arcades.
- Purchase Loople Bus tickets from the bus station. This is a tour bus that makes a loop around Sendai’s famous landmarks. Price: $6 per person for unlimited access for the day. (Note that the museums are closed on Mondays).
- Visit the final resting place of Date Masamune, Sendai’s most famous feudal lord. (Accessible from the Loople). Admission: Free.
- Visit the ruins of Sendai Castle. (Accessible from the Loople). Admission: $4.50 per person.
- Visit Osaki Hachimangu Shrine, dedicated to the god of warding off evil. (Accessible from the Loople). Admission: Free.
- Try Sendai’s famous dish, gyutan, at Rikyu Ichibancho Yanagi. Price: $25 for two entrees that come with soup and salad.
- Sleep at Hotel Vista Sendai. Price: $75 per night.

Day 5 – Explore Nearby Matsushima
- Board Senseiki line to Matsushimakaigan. Journey time: 0h 45m. (Since this is a local train, you will not need to pre-book seat assignments).
Suggested Activities:
- Visit Zuiganji Temple. Don’t miss the zen garden, or the caves outside where monks once lived and meditated. Admission: $7 per person.
- Enjoy a sightseeing cruise around the bay. Price $18 per person.
- Walk the scenic red bridge to Fukuura-Jima. Admission: $2 per person.
- Try Sendai’s famous sweet: zunda mochi.
- Train back to Sendai Station.
- Sleep at Hotel Vista Sendai. Price: $75 per night.

Day 6 – Travel to Sapporo
- Check out of hotel early as it is a fairly long trek up to Japan’s northernmost island. As the journey requires two trains, that don’t run as often, these tickets may be worth booking a day or several in advance.
- Purchase some bento boxes for the journey! Price: varies, around $10-$12 per box.
- Sample route: Hayabusa to Shin-Hakodate-Hokuto. Debark at Shin-Hakodate-Hokuto Station. Journey time: 2h 30m. Followed by Super Hokuto to Sapporo. Debark at Sapporo Station. Journey time: 3h 30m.
- We stayed in an Airbnb across the street from Nakajima park, but it looks like the listing is no longer active. Price: $85 per night.
Suggested Activities:
- Splurge on shabu shabu dinner at Kirin Beer Garden. Price: $180 for two all-you-can-eat dinners and drinks.
Day 7 – Explore Sapporo
Suggested Activities:
- Try a heaping bowl of hot ramen at the little shop across the street, to the west side of Nakajima Park. Price: $9 per bowl.
- Visit JR Tower and enjoy the view of the city. Admission: $7 per person.
- In mid June, attend the Hokkaido Shrine Festival. Admission: Free.
- Sleep at Airbnb. Price: $85 per night.
Day 8 – Explore Sapporo Some More
Suggested Activities:
- Try soup curry at Suage+, my new favorite Japanese dish I never knew existed!
- Visit the quirky TV Tower and enjoy the view of Odori Park. Admission: $7 per person.
- Walk Odori Park. Don’t miss Black Slide Mantra. Admission: Free.
- Sample Japan’s craft beer scene at The Craft.
- Sleep at Airbnb. Price: $85 per night.

Day 9 – Travel Back to Tokyo
- Once again, check out fairly early as it is a long trek back down to the main island. Due to the frequency that the train runs, it may be worth booking seat assignments a day or several in advance.
- Sample route: Super Hokuto to Hakodate. Debark at Shin-Hakodate-Hokuto Station. Journey time: 3h 16m. Followed by, Hayabusa to Tokyo. Debark at Tokyo Station. Journey time: 4h 29m.
- Purchase some bento boxes for the journey! Price: varies, around $10-$12 each.
- Sleep at Belken Hotel Tokyo. Price: $120 per night. (Note: this was the tiniest room we stayed in, and was mostly just bed immediately surrounded by wall on three sides, with barely any floor space on the fourth side. In fact, the room didn’t even list the square meterage, just the bed width at 153cm. Again, beware the tiny rooms!)
Day 10 – Travel to Hakone
Suggested Activities:
- Explore downstairs Tokyo Station for endless food options.
- Book tickets to Odawara. Sample route: Kodama to Shinosaka. Debark at Odawara Station. Journey time: 0h 35m.
- At Odawara Station, find a Tourist Information booth and purchase a Hakone Free Pass. We did the 3-day pass. This is your ticket to unlimited access to Hakone’s 5 different modes of transportation, and some additional discounts around the area. You can store your JR passes someplace safe; the Hakone Free Passes will be all you need for the next few days. Price: $45 each.
- Ride the Hakone Tozan Train to Hakone Yumoto. Journey time: 0h 16m. This is the main area of Hakone. From here you can sightsee around the entire loop, in either direction, via 5 different modes of transportation. There are numerous accommodation options at various different stops along the way.
- Hakone is known for onsens, and this is a great place to experience staying at one. They ended up being fairly pricy though, and so we booked an Airbnb with the idea of visiting an onsen (sans accommodation) separately.
- Ride the Hakone Tozan Train to Gora. Debark at Miyanoshita Station. Journey time: 0h 27m.
- We slept in the Miyanoshita area, at the Airbnb listing titled “legally-rented mountain&hotspring 7min>STA TV+Int”. It is still active at the time of writing this. Everything about the place was recommendable, except the noise level. Book the upstairs unit if at all possible. Price: $128 per night.
- Try the boiled shirasu (small whitefish) bowl & soup at Men 398-1. Price: $9.00 per bowl.
Day 11 – Explore Hakone
Suggested Activities:
- Ride the Hakone Tozan Train up the mountain to the end of the line. Bonus: In June the hydrangeas are in full bloom, making the already beautiful ride even more scenic.
- Ride the Hakone Tozan Cable Car.
- Ride the Hakone Tozan Ropeway.
- Stop at the summit for a snack of famous, hot-spring boiled, black eggs. Price: $5 for 5 eggs.
- Continue on the Hakone Tozan Ropeway back down the mountain to Lake Ashi. (At the time of our visit, this second ropeway was under maintenance and we boarded a bus instead).
- Ride the pirate ship around the lake.
- Complete the loop via bus, ending back at Hakone-Yumoto station.
- Experience a Japanese onsen (hot spring) at Hakone Yuryo. Many onsens are public, and therefor, separate men and women into different rooms. If you are traveling with your other half, Hakone Yuryo offers three different types of private rooms, so that you can enjoy the experience together. Or if you have tattoos, you will also want to book a private room. Price for one hour in the nicest room: $57.
- Sleep at Airbnb. Price: $128 per night.

Day 12 – Travel to Kyoto
Suggested Activities:
- Ride the Hakone Loop again in the opposite direction! Our tour the previous day was the worst visibility possible, so we decided to give it a second try before heading to Kyoto. It didn’t cost us a penny extra as our Hakone Free Passes were still valid. We dropped off our backpacks in lockers across the street from Hakone-Yumoto Station for $6 each.
- Ride the Hakone Tozan train to Odawara Station. Journey time: 0h 17m.
- Switch back to JR Passes, and book tickets to Kyoto. Sample route: Hikari to Shinosaka. Debark at Kyoto Station. Journey time: 2h 3m.
- Sleep at Villa Front Kyoto Seimei. This was a brand new Airbnb-style hotel (read: hotel rooms with no staff). The price was unbeatable, and the rooms uncharacteristically spacious, but the check-in was a pain, as it required walking to the drug store across the street from the train station to retrieve the keys, then boarding a local bus (no English) for around 20 minutes to the property. So whether or not the hassle is worth the savings is up to you. Price: $60 per night.
Day 13 – Explore Kyoto
Suggested Activities:
- Try an entirely unagi (freshwater eel) meal at Kyogoku Kane-yo. The dishes are small, so order multiples and share. Price: $62 for four dishes and two carafes of sake.
- Try taiyaki (dessert of a custard-stuffed, fish-shaped cone, topped off with ice cream).
- Wander around Shinyogoku Shopping District.
- Visit the nightingale floors of Nijo Castle. (We were too wiped to do this and it was the only thing on our itinerary that we didn’t get to. I can say from a previous visit that it is a cool experience). Admission: $6 per person.
- Sleep at Villa Front Kyoto Seimei. Price: $60 per night.

Day 14 – Kyoto’s Tourist Traps
Suggested Activities (although be warned, while magical places, at the time of our visit, they had become quite the tourist traps):
- Visit Arashiyama Bamboo Grove. Arrive as early as possible to beat the crowds. Admission: Free.
- Try an entirely tofu meal at Saga Tofu Ine, near the entrance of the bamboo grove. Price: $20 per set meal.
- Visit Fushimi Inari Shrine and marvel at thousands of vermillion torii gates while you relive your favorite scene from Memoirs of a Geisha. Admission: Free.
- Visit Kinkaku-ji, or the Golden Pavilion. Bonus if you visit at sunset. (It closes well before sunset during the summer months). Admission: $4 per person.
- Wander around Gion after dark and enjoy the lantern-lit pathways.
- Sleep at Villa Front Kyoto Seimei. Price: $60 per night.

Day 15 – Travel to Osaka
- Arrive at the train station early and check out the 11th floor for lots of dining options. The Korean restaurant is good if you are missing spicy foods yet. Price: $37 for way too much food for two people.
- Book tickets to Shinosaka Station. Sample route: Nozomi to Hakota. Debark at Shinosaka. Journey time: 0h 13m.
- Transfer to a local train to Osaka Station. Sample route: JR Tokaido Sanyo Main Line Rapid to Kakogawa. Debark at Osaka. Journey time: 0h 4m.
Suggested Activities:
- Visit Dotonbori and marvel at the bright lights and giant, animated food signs.
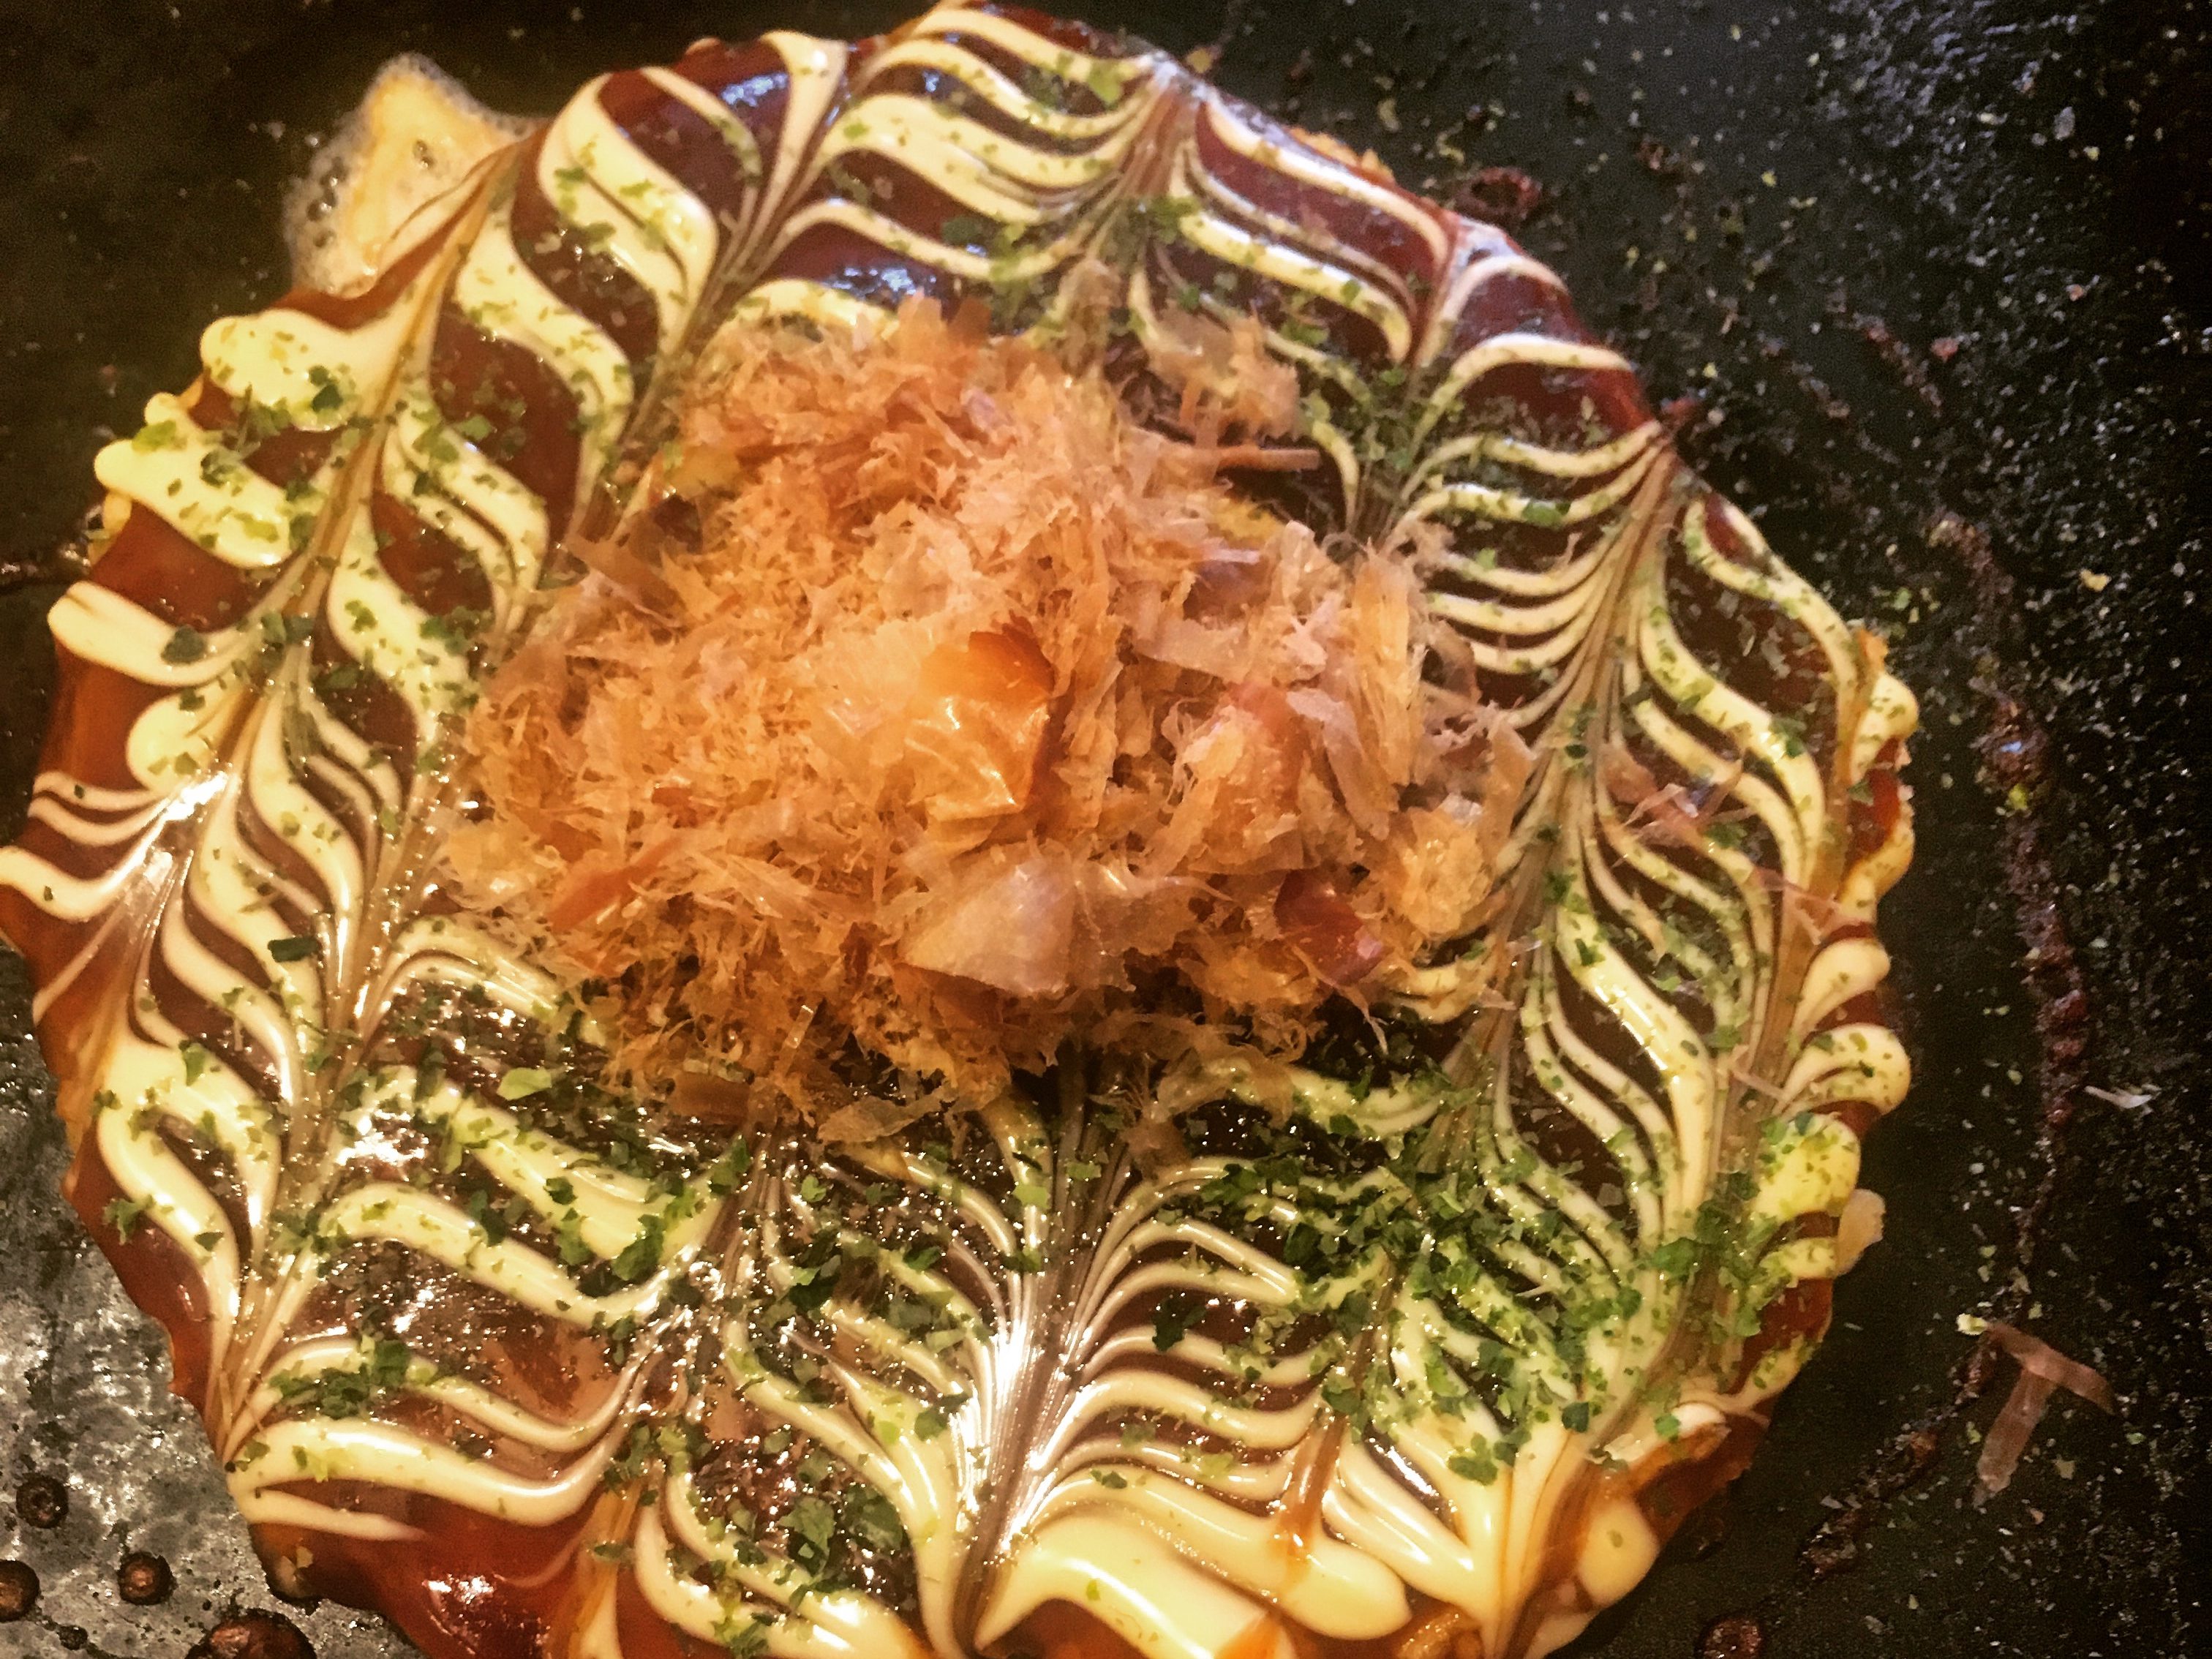
- Try the regional specialty, okonomiyaki. Price: $10-$15 per pancake.
- Sleep at Hotel Mystays Premier Dojima. Price: $115 per night.
Day 16 – Explore Osaka
Suggested Activities:
- This was meant to be our Universal Studios Day and so I will keep it here on the itinerary. Admission: $79 each. Express Passes (to skip the lines): An additional $104 each.
- Try multiple varieties of Osaka’s other regional specialty, takoyaki, at Takopia, just outside the park gate. Price: Around $10 per order with small beers.
- For dinner, pig out on kaiten zushi (conveyer belt sushi) at Isono Ryotaro Namba Shop. Price: $1 per plate. You heard that right.
- Sleep at Hotel Mystays Premier Dojima. Price: $115 per night.

Day 17 – Finish Exploring Osaka and Travel to Hiroshima
Suggested Activities:
- Check-out and leave backpacks in lockers at Osaka Station. Price: $6 each.
- Visit Osaka Aquarium, one of the largest in the world, and say hello to the whale sharks, mola molas, and king spider crabs. Admission: $23 each.
- Pick up bags and ride the local train back to Shinosaka Station.
- Book tickets to Hiroshima. Sample route: Sakura Line to Kagoshimachuo. Debark at Hiroshima Station. Journey time: 1h 26m.
- Try Hiroshima-style Okonomiyaki (different from the Osaka-style). Price: $10 per pancake.
- Sleep at Hotel Granvia Hiroshima. Price: $92 per night.
Day 18 – Explore Hiroshima and Take in the History
Suggested Activities:
- Visit Hiroshima Peace Memorial Museum. Admission: $2 each.
- Walk the Peace Park, don’t miss the Cenotaph, Flame of Peace, Children’s Peace Monument, and the Bell of Peace. Admission: Free.
- Visit the Atomic Bomb Dome. Admission: Free.
- Unwind and enjoy an oyster dinner (Hiroshima’s specialty) on the river bank at Oyster Conclave. Price: $70 for a set meal that we split and drinks.
- Sleep at Hotel Granvia Hiroshima. Price: $92 per night.

Day 19 – Travel to Himeji and Visit the Castle
- Book tickets to Himeji. Sample route: Sakura Line to Shinosaka. Debark at Himeji Station. Journey time: 0h 56m.
Suggested Activities:
- Visit Himeji Castle and unleash your inner samurai. Admission: $10 each.
- Try the best, homemade udon noodles you ever tasted at Menme Noodles. Price: $7 per bowl.
- Sleep at Hotel Nikko Himeji. Price: $100 per night.

Day 20 – Return to Tokyo
- Book tickets to Shibuya. Sample route: Hikari to Tokyo. Debark at Shinagawa Station. Journey time: 3h 27m. Followed by JR Yamanote Line to Shibuya, Shinjuku. Debark at Shibuya Station. Journey time: 0h 13m.
- Sleep at Shibuya Hotel En. Price: $146 per night.
Days 21-25 – Slow Down and Explore Tokyo
Suggested Activities:
- Live out your Mario Kart dreams with a MariCar tour around the city. Price: Varies depending on tour length, around $100 per person. Must have an International Driver’s Permit to participate.
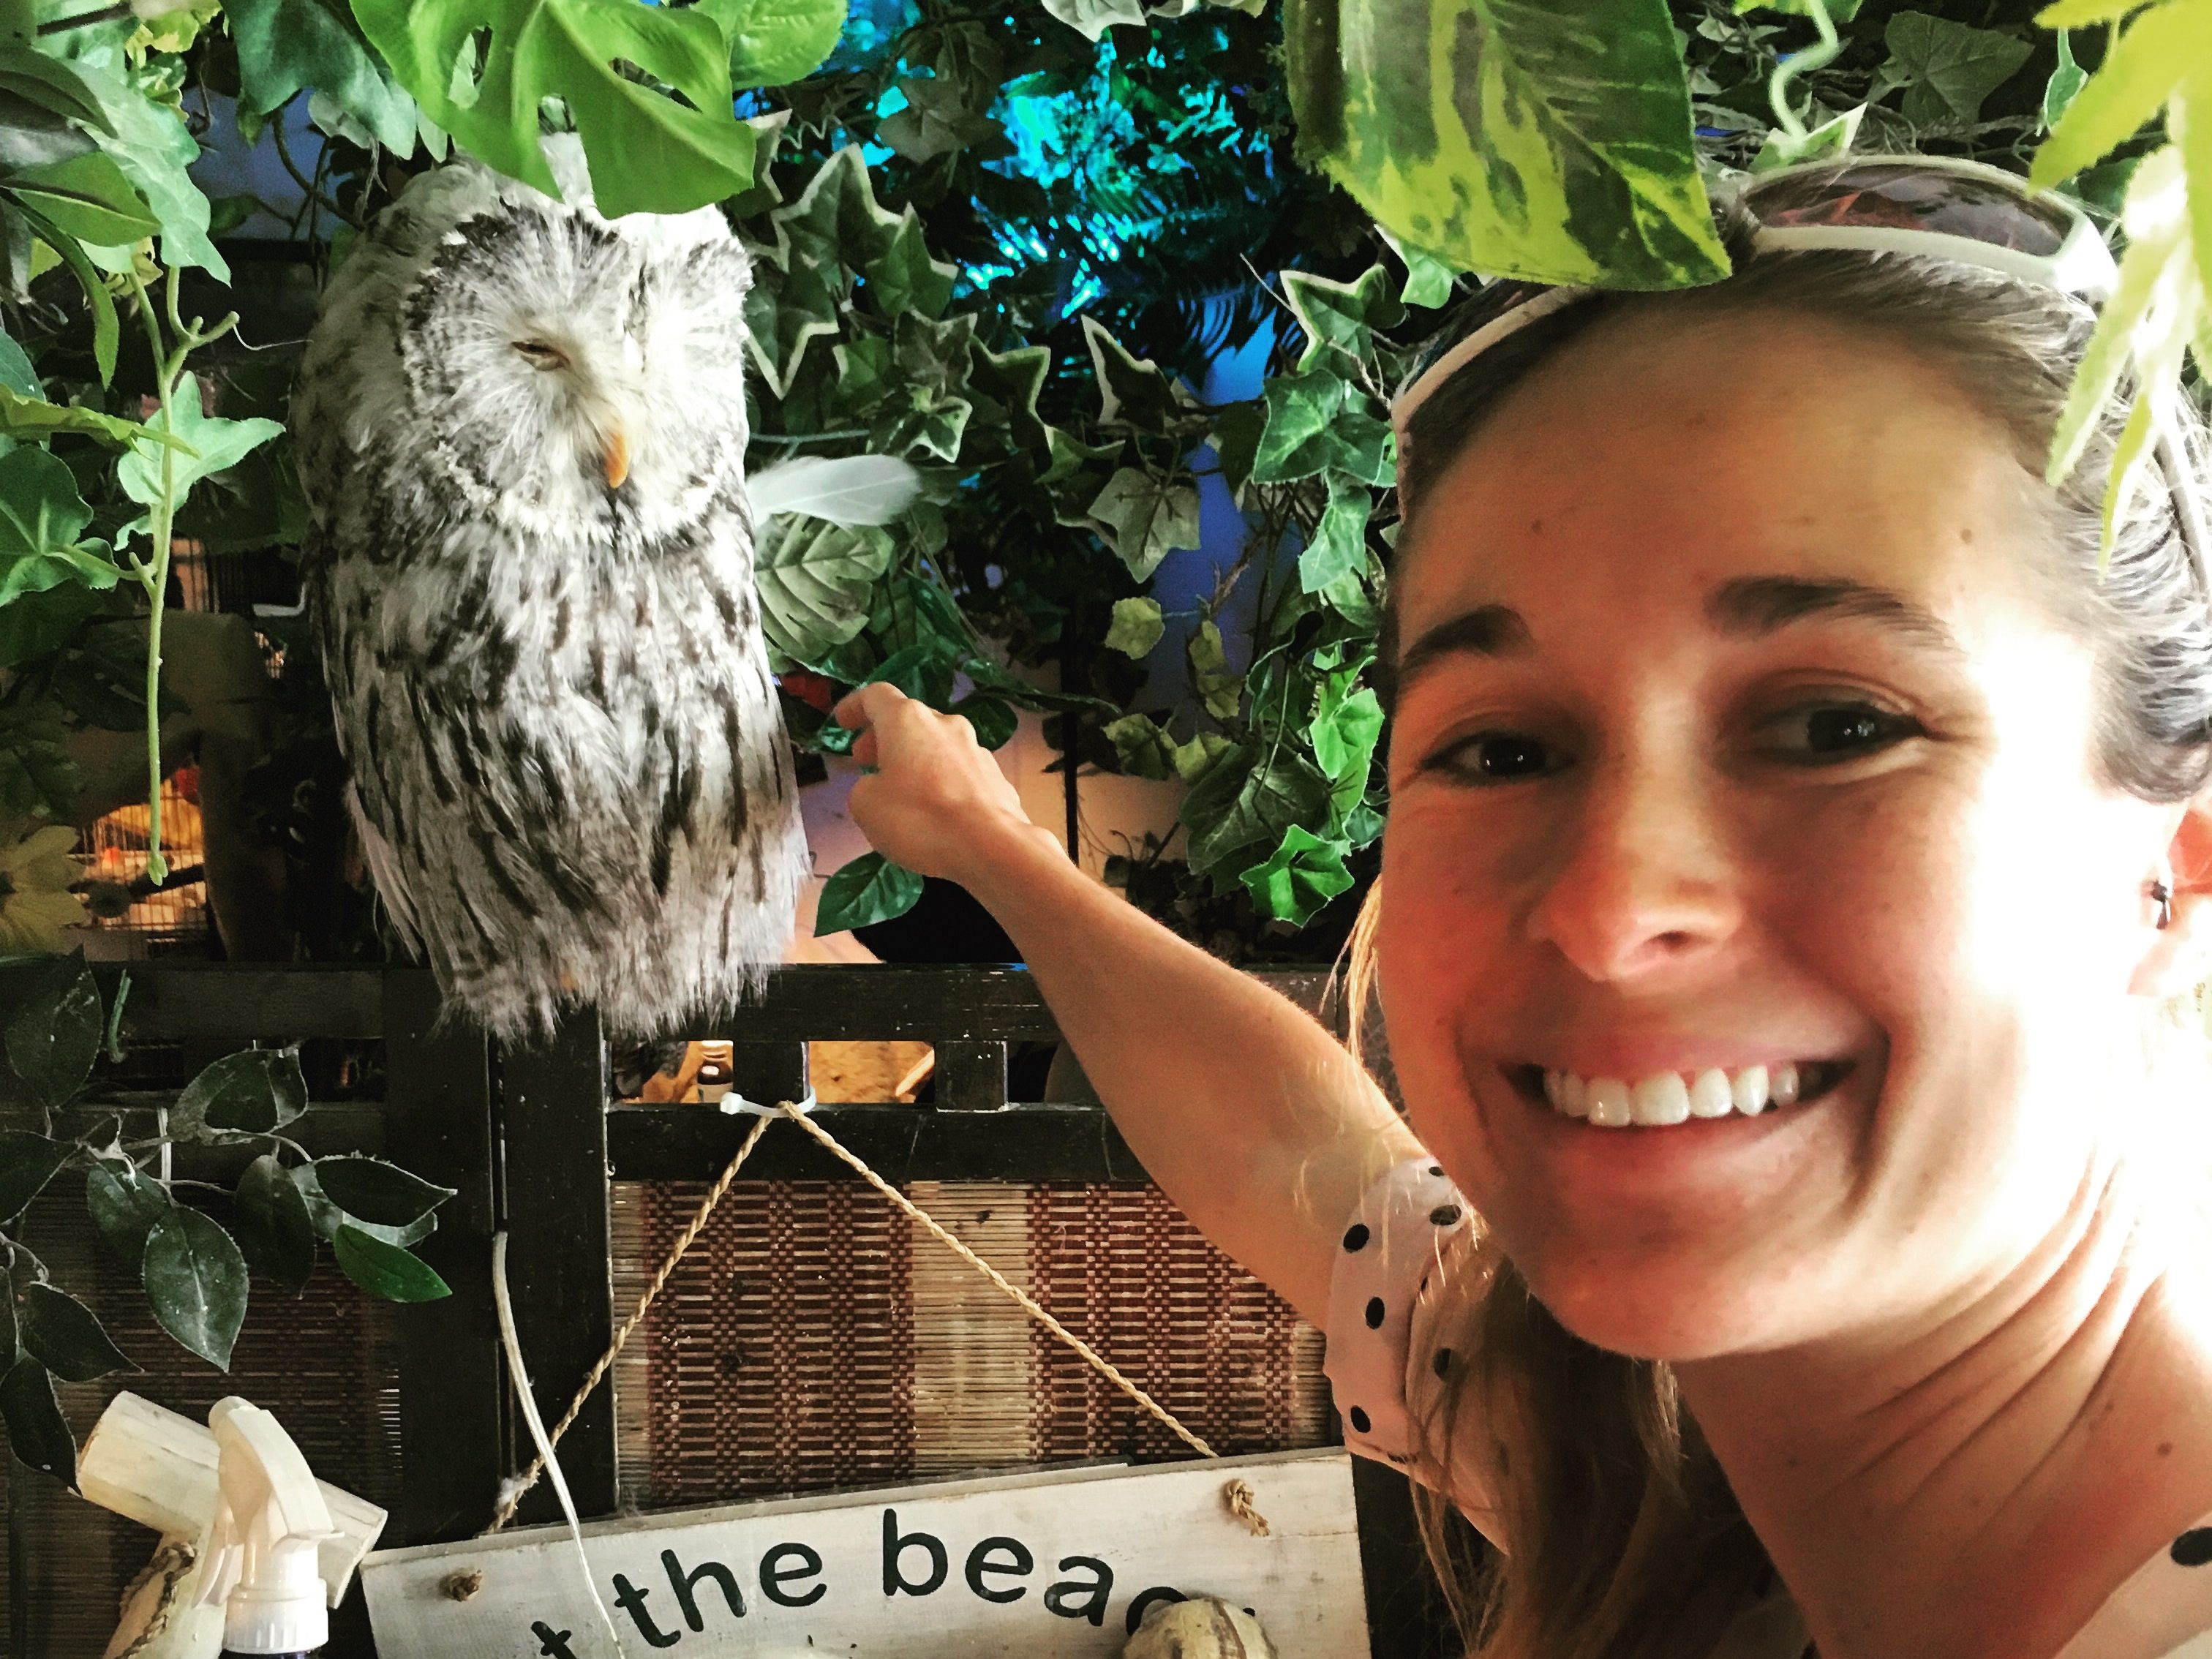
- Embrace your inner child who wanted an owl after reading Harry Potter and visit an owl cafe. Try Owl no Mori in Akihabara. Price: $10 each, includes a free drink.
- Walk the Shibuya Scramble, the busiest intersection in the world. Price: Free.
- Pay homage to the statue of Hachiko, the world’s most loyal dog, just outside Shibuya Station. Price: Free.
- Experience a Japanese Cinema. Price: $18 per person. Popcorn and drinks: $10.
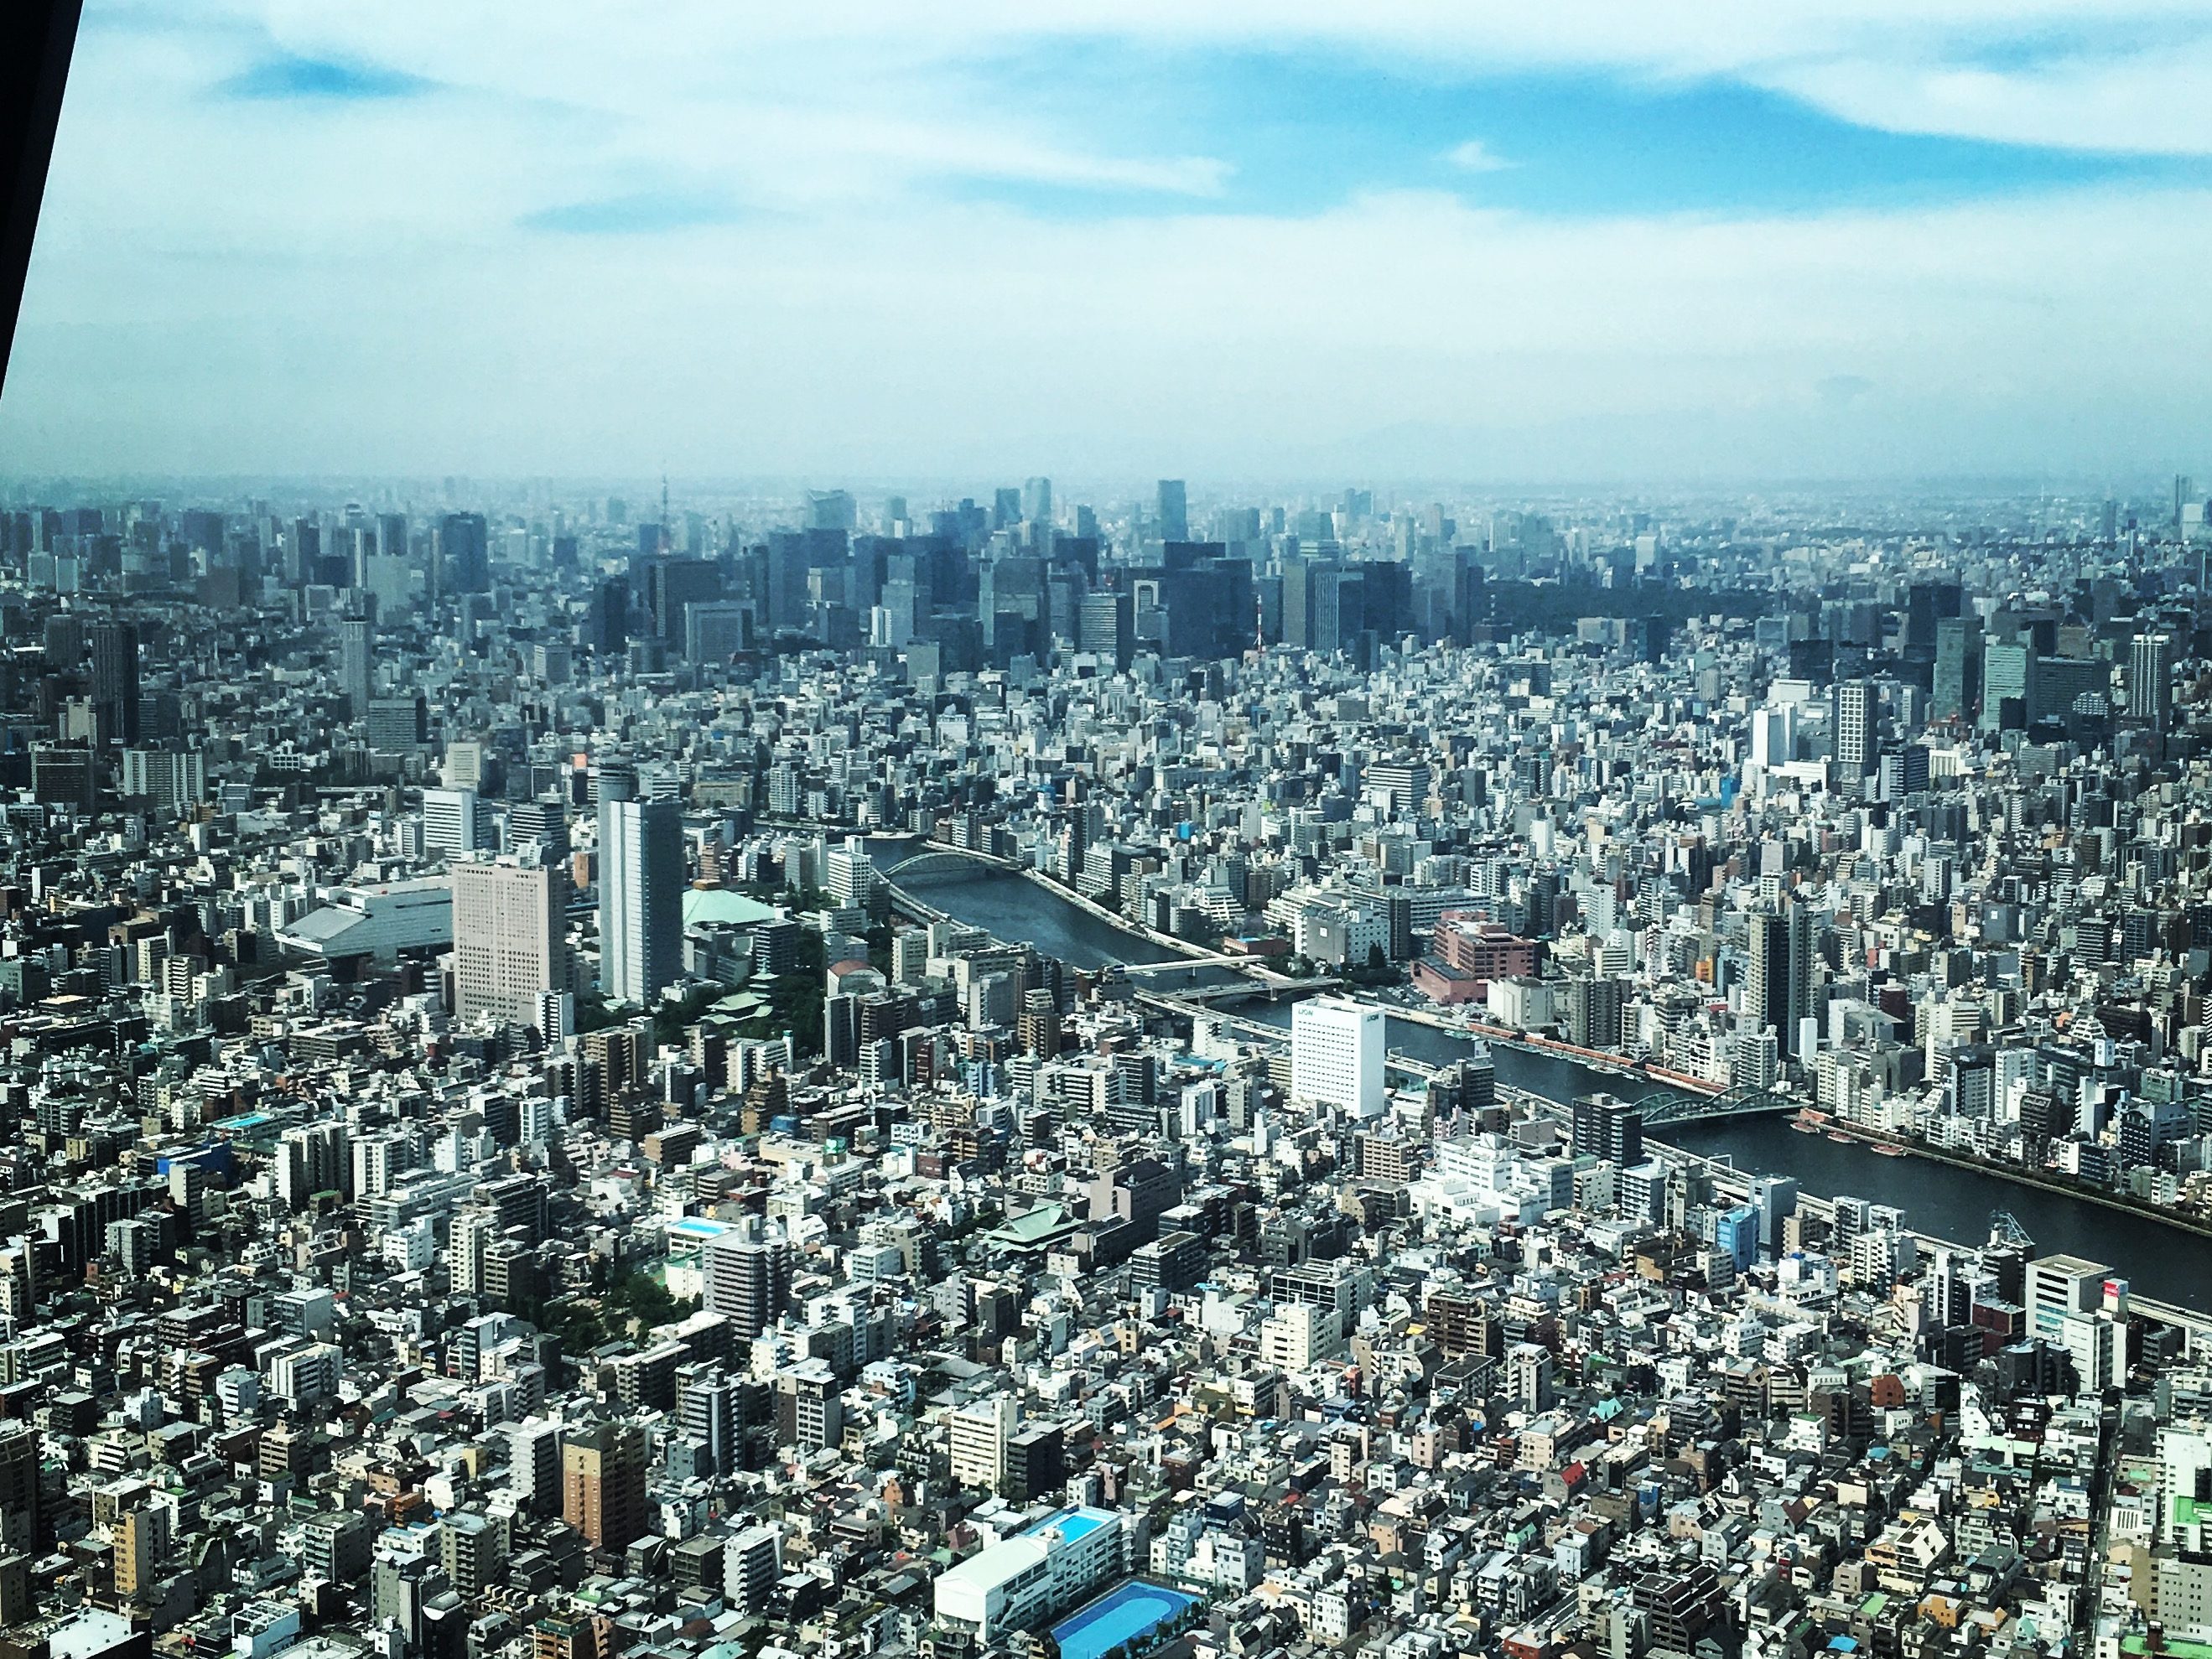
- Visit Tokyo Skytree, the word’s tallest, freestanding tower. Price: $20 each for the 350m observation deck; an additional $10 each for the 450m observation deck.
- We debated whether or not to go to the Robot Restaurant. Many of the reviews said that it was overpriced and gimmicky so we ended up skipping it.
- Sleep at Shibuya Hotel En. Price: $146 per night.

Day 26 – Sayonara, Japan
- Book tickets to Narita Airport on the Narita Express. Price: $32 each. (Remember, your JR Passes will be expired by this point).